Getting Started with the Haulage Operations Platform – Enterprise (HOPE)
Built with hauliers at its heart, Haulio’s Haulage Operations Platform – Enterprise (HOPE) is an end-to-end digital tool for you to manage all your trucking jobs.
Communicate and manage all your jobs, fleet, drivers and customers in one place.
In this guide, we will cover 4 main components:
Setting Up
Managing Company Users
Quotation Default Pricings
Master Data Setup
Set up Customer Profile, Customer Quotation and Customer Delivery locations
Set up Yard Locations
Creating a new Job Order
Job creation workflow
Maximizing the Job List page
How to use the filters
Container milestones
Creating HCS trip cards
Job Management page
Edit details
Delete job
Add/remove containers
Export to PDF
Creating HCS trip card
Billing tab + Additional charges
Sublet Jobs
For a more in-depth guide on the product, reach out to us via hello@haulio.io and we’ll be glad to assist!
Setting Up
1) Managing Company Users
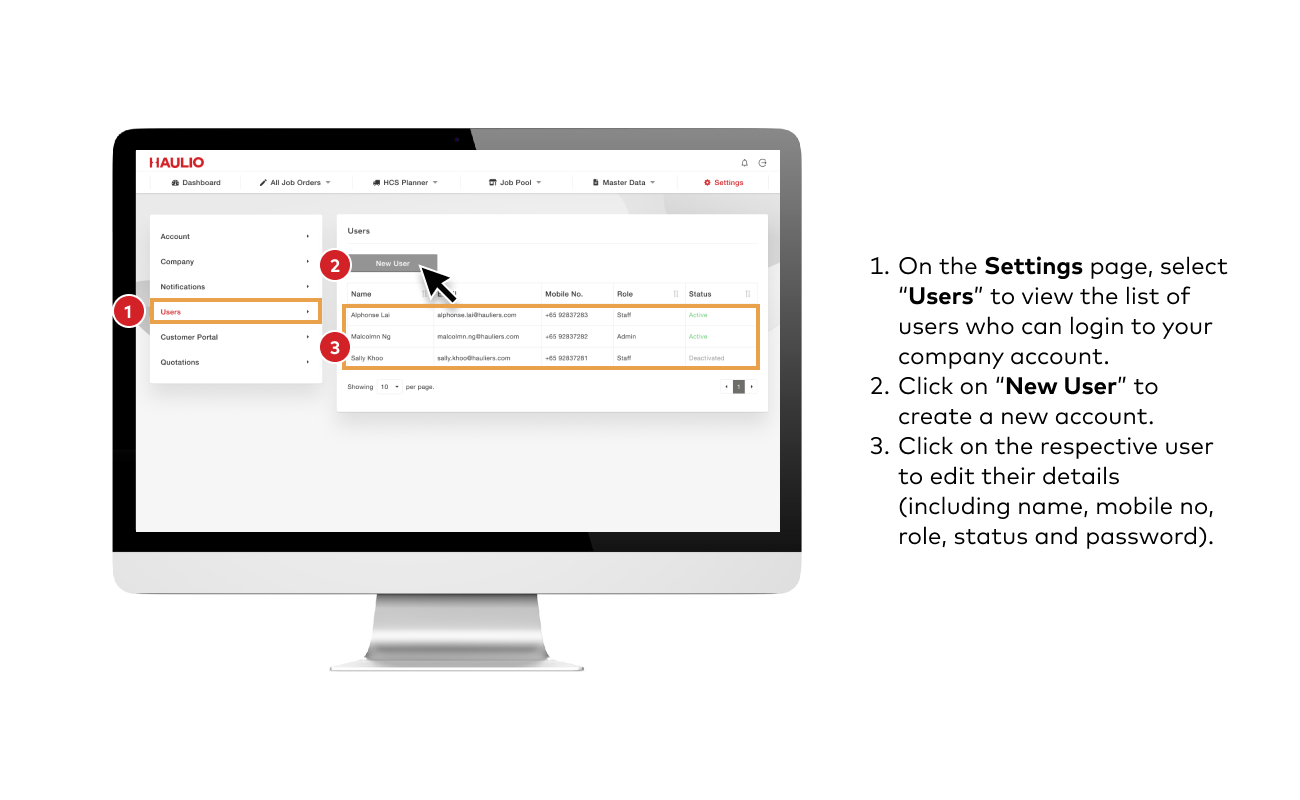
1. Managing Company Users
On the Settings page, select “Users” to view the list of users who can login to your company account.
To create a new account, click on “New User”.
You can click on the respective user to edit their details.
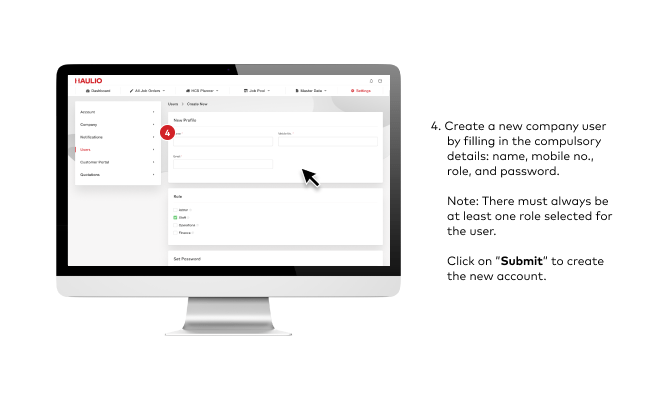
2. Create New User
Create a new company user by filling in the compulsory details: name, mobile number, role and password.
Note: There must always be at least one role selected for the user.
Click on “Submit” to create the new account.
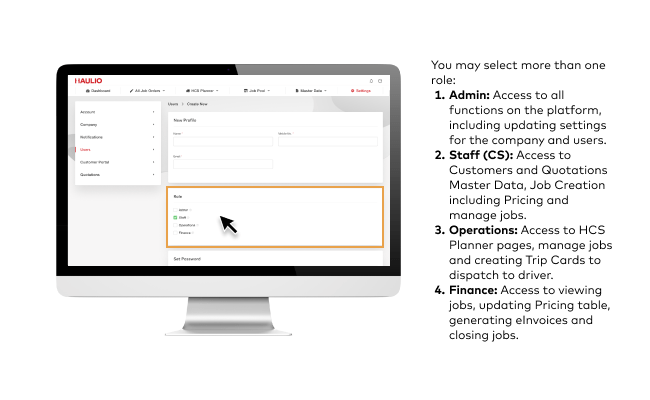
3. Select User Roles
You may select more than one role:
Admin: Access to all functions on the platform, including updating settings for the company and users.
Staff (CS): Access to Customers and Quotations Master Data, Job Creation including Pricing and manage jobs.
Operations: Access to HCS Planner pages, manage jobs and creating Trip Cards to dispatch to driver.
Finance: Access to viewing jobs, updating Pricing table, generating eInvoices and closing jobs.
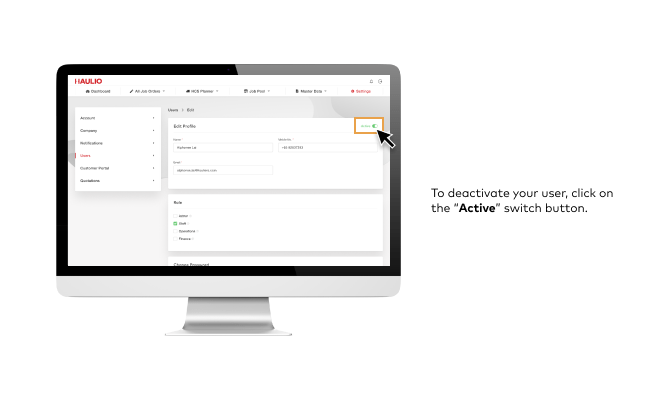
4. Deactivate User
To deactivate your user, click on the “Active” switch button.
2) Quotation Default Pricings
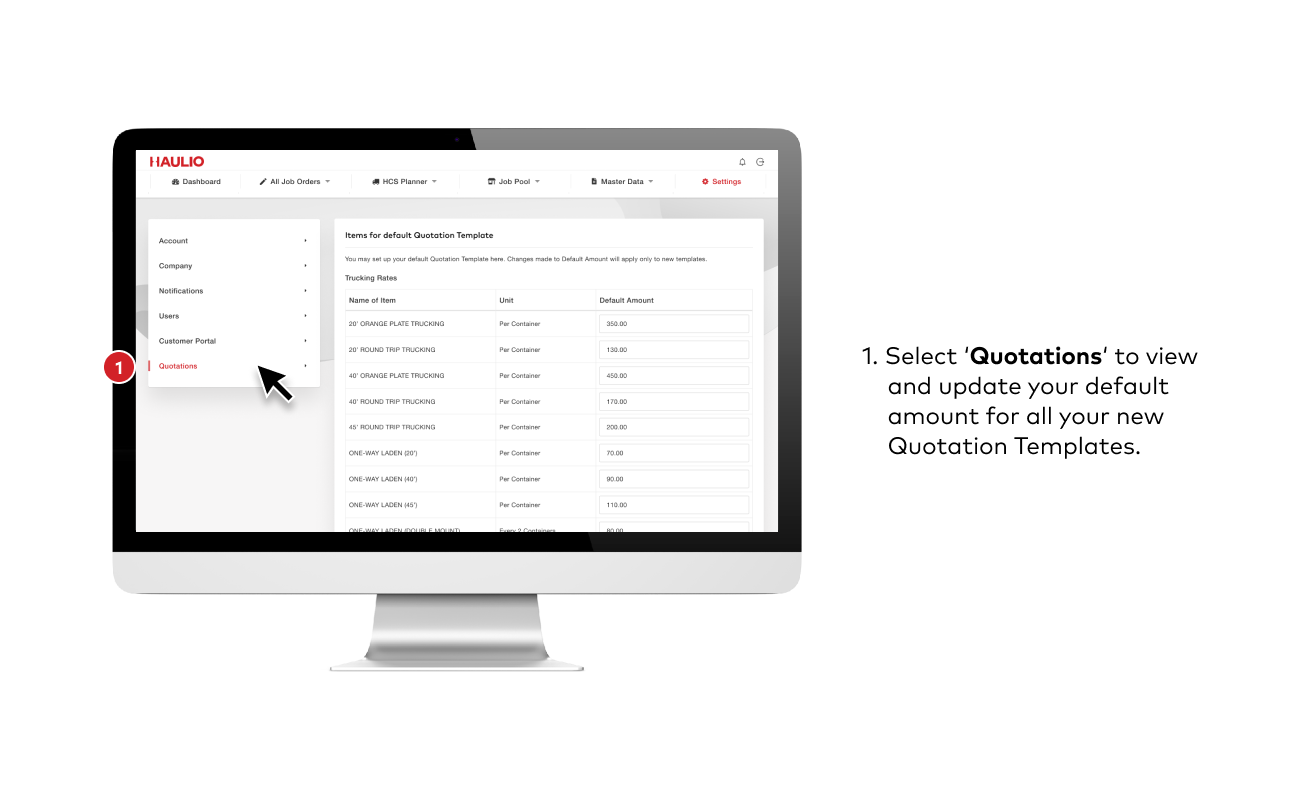
1. Add Default Quotation Amount
Select “Quotations” to view and update your default amount for all your new Quotation Templates.
Items shown in this list are provided by our system with pricing logics. If you wish to add your own items, you may do so in your Quotation Templates.
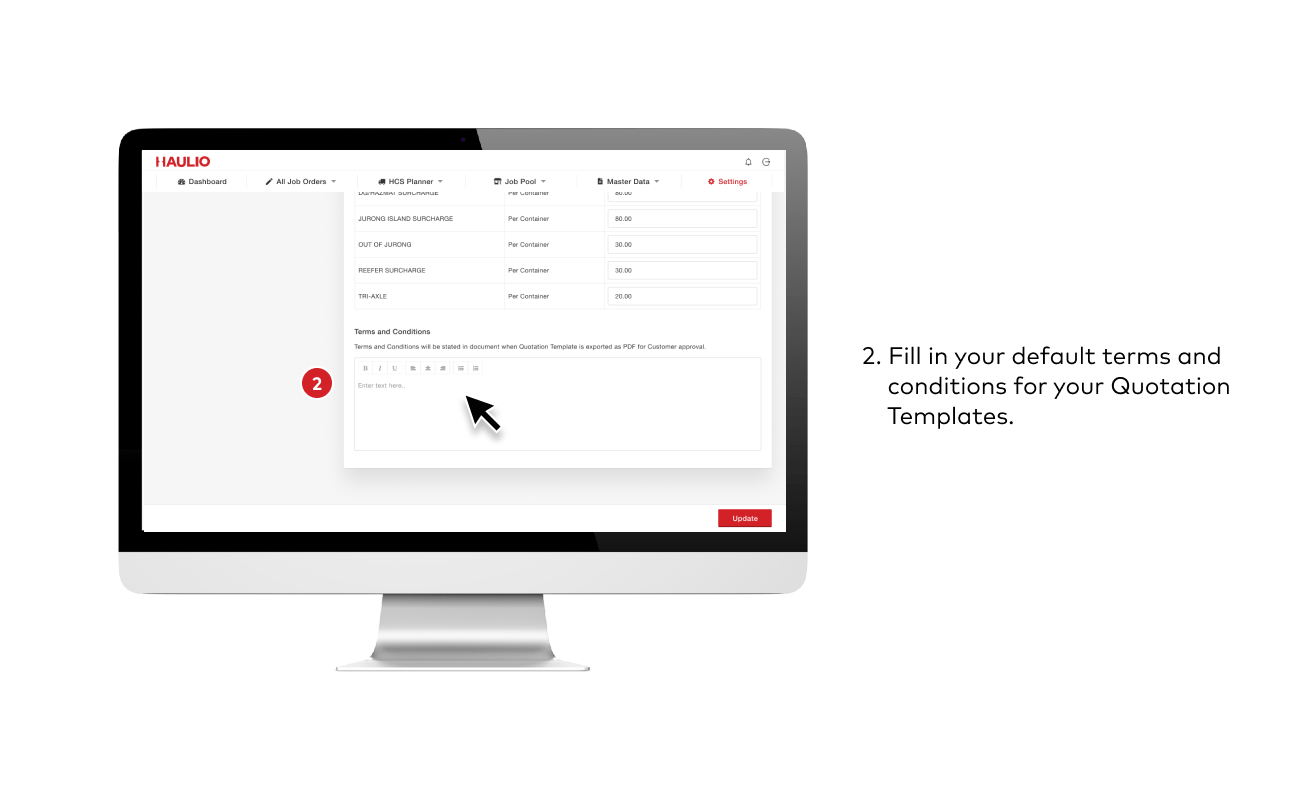
2. Update Terms & Conditions for your Quotations
Fill in your default terms and conditions for your Quotation Templates.
Tip!Always remember to click on “Update” to save your changes.
Master Data Setup
1) Setup Customer Profile, Quotation and Delivery Locations
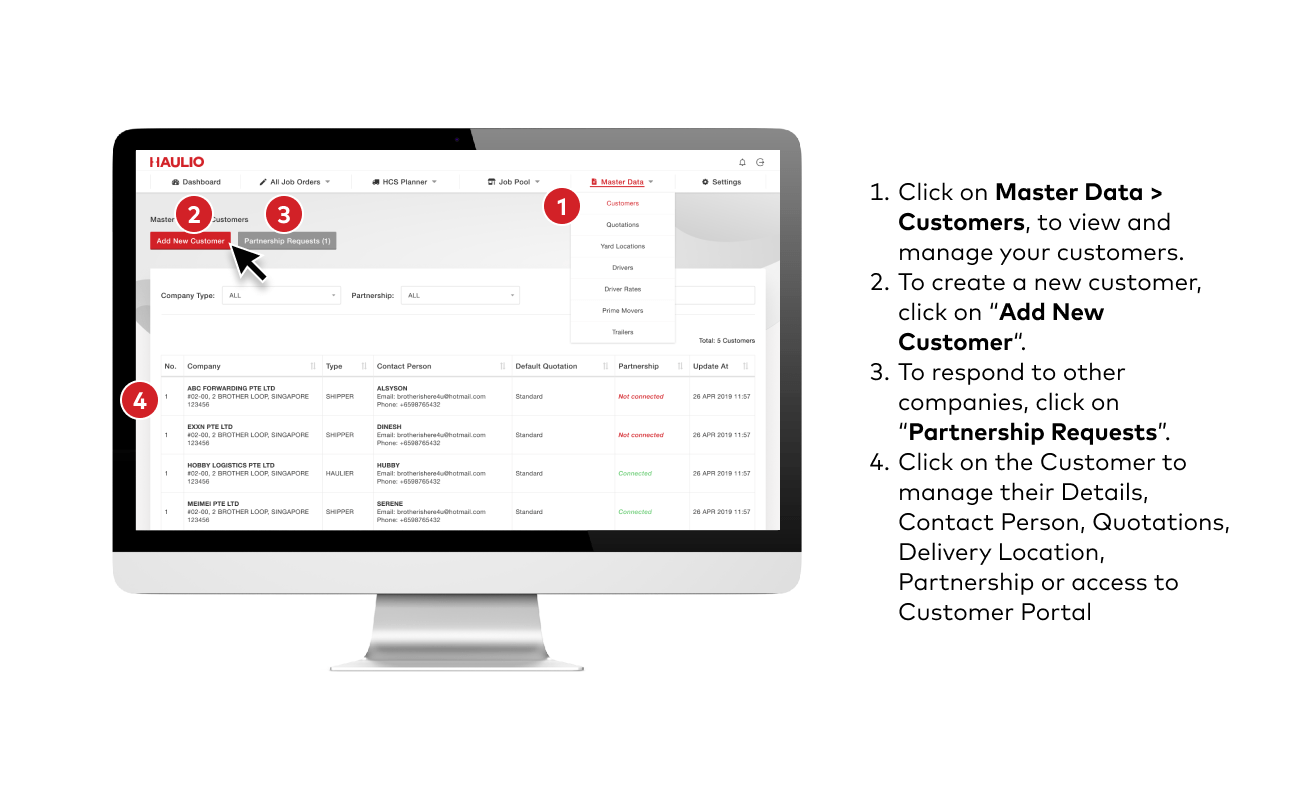
1. View Customers
Click on Master Data > Customers, to view and manage your customers.
To create a new customer, click on “Add New Customer“.
To respond to other companies, click on “Partnership Requests”.
Click on the Customer to manage their Details, Contact Person, Quotations, Delivery Location, Partnership or access to Customer Portal
2. Create New Customer
Fill in the details to create a new customer.
Company Name
Address
Contact Details
Payment Terms
Contact Person(s)
Customer Portal (Should you want this customer to access the platform, allow access here.)
Click “Next” to move to the next step.
3. Create Quotation
Input the Quotation Name. You can choose to set the quotation as default – this will affect the default pricing amounts.
You can change the amounts accordingly.
Click “Done” to create the customer.
Note:The quotation must be approved for you to use it in your job creation. Once it is approved, you cannot undo the action. However, you can still edit the template.
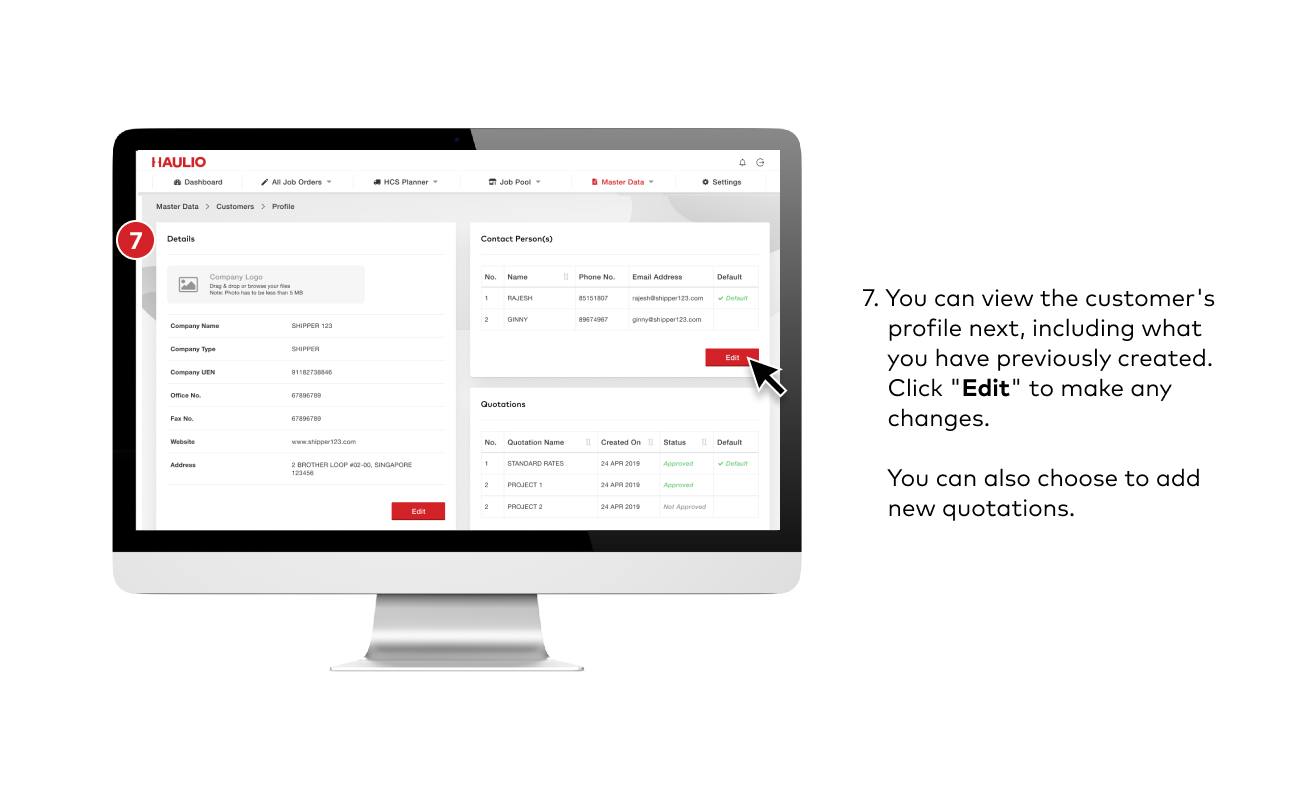
4. View Customer Profile
You can view the customer’s profile, including what you have previously created. Click “Edit” to make any changes.
You can also choose to add new quotations.
5. Add Delivery Location(s)
Next. you can add Delivery Location(s) for customers here, so that the location can be filled automatically whenever you create a job.
Click on “Add New” to create new Delivery Location for this customer.
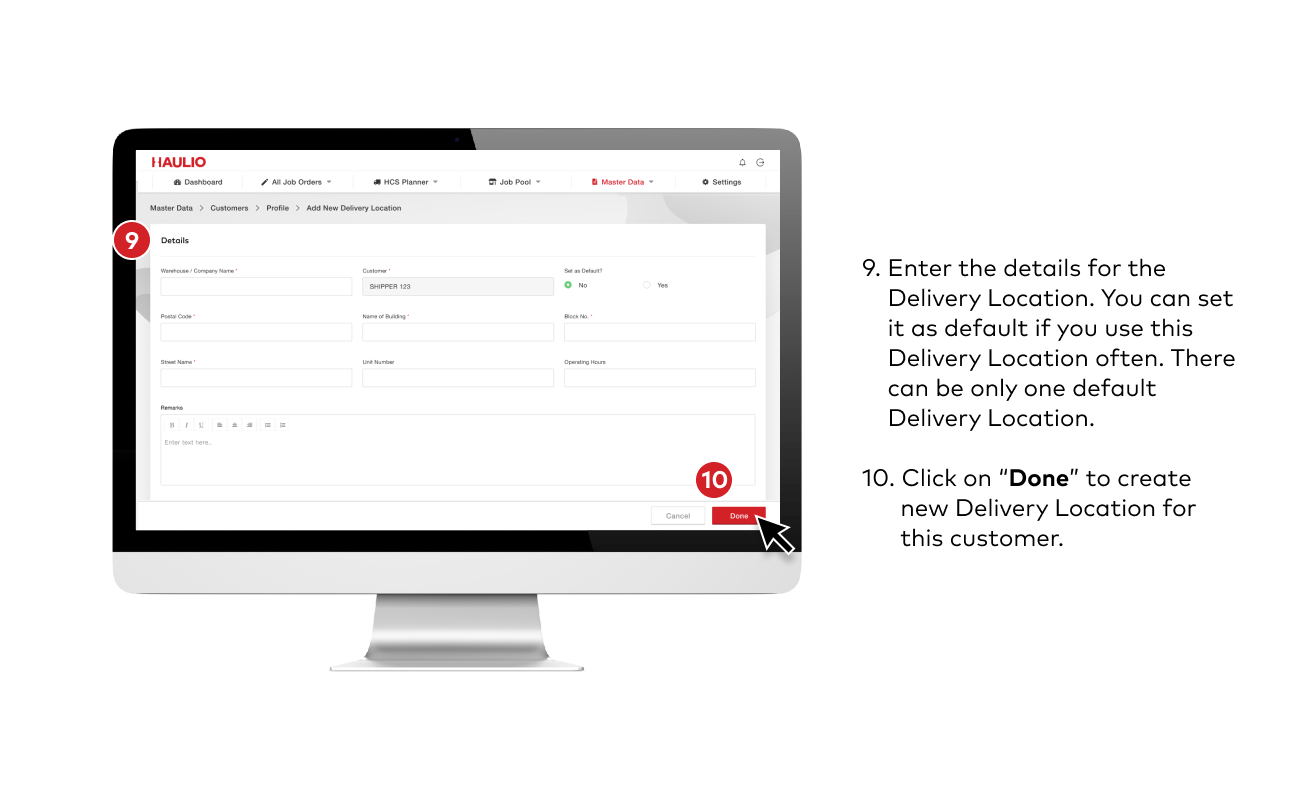
6. Create Delivery Location(s)
Enter the details for the Delivery Location. You can set it as default if you use this Delivery Location often. There can be only one default Delivery Location.
Click on “Done” to create new Delivery Location for this customer.
7. Deactivate Delivery Location(s)
Click into the Delivery Location to edit and update details.
Click on the Active switch button to deactivate the Delivery Location. Deactivated Delivery Locations will not appear in the job’s address location fields.
Tip!Always remember to click on “Update” to save your changes.
2) Setup Yard Locations
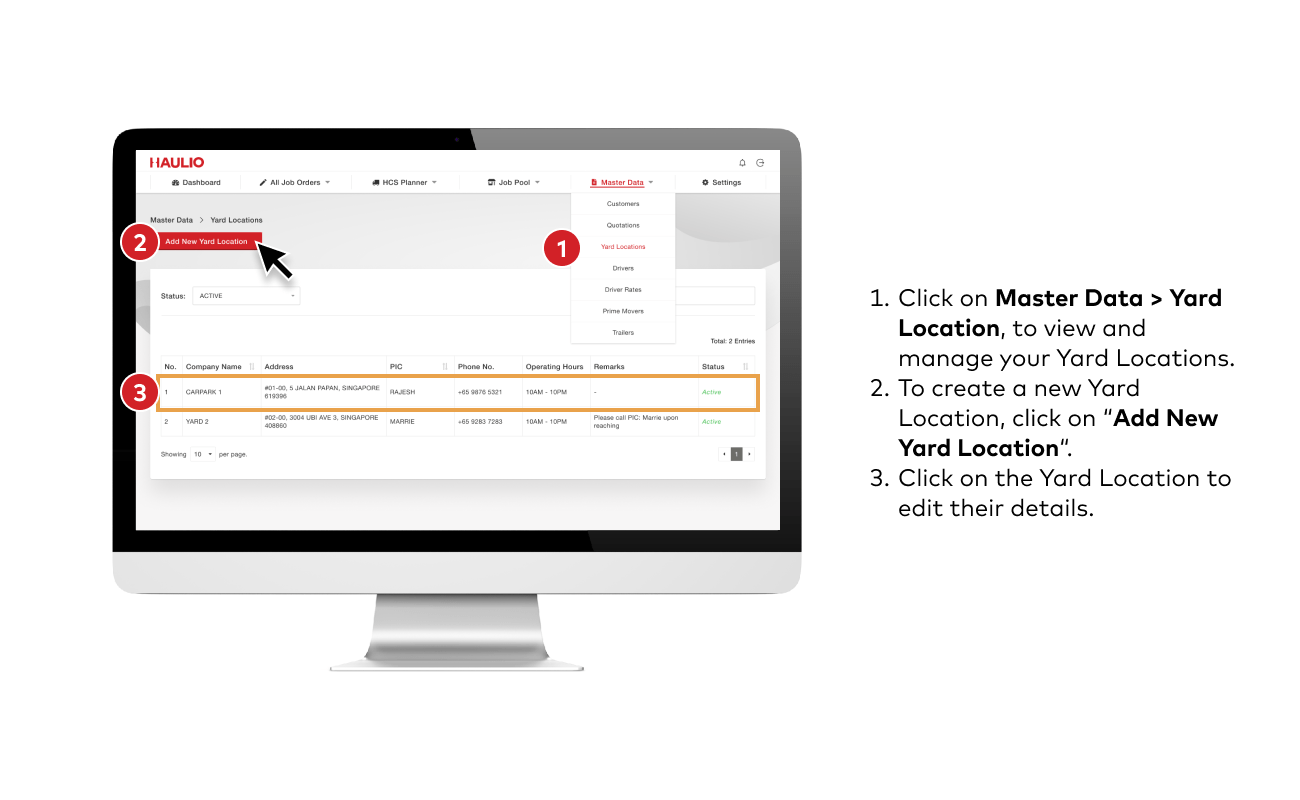
1. View Yard Locations
Click on Master Data > Yard Locations, to view and manage your Yard Locations. Your Yard Locations will appear for trip card creation location fields for all customers.
To create a new Yard Location, click on “Add New Yard Location“.
Click on the Yard Location to edit their details.
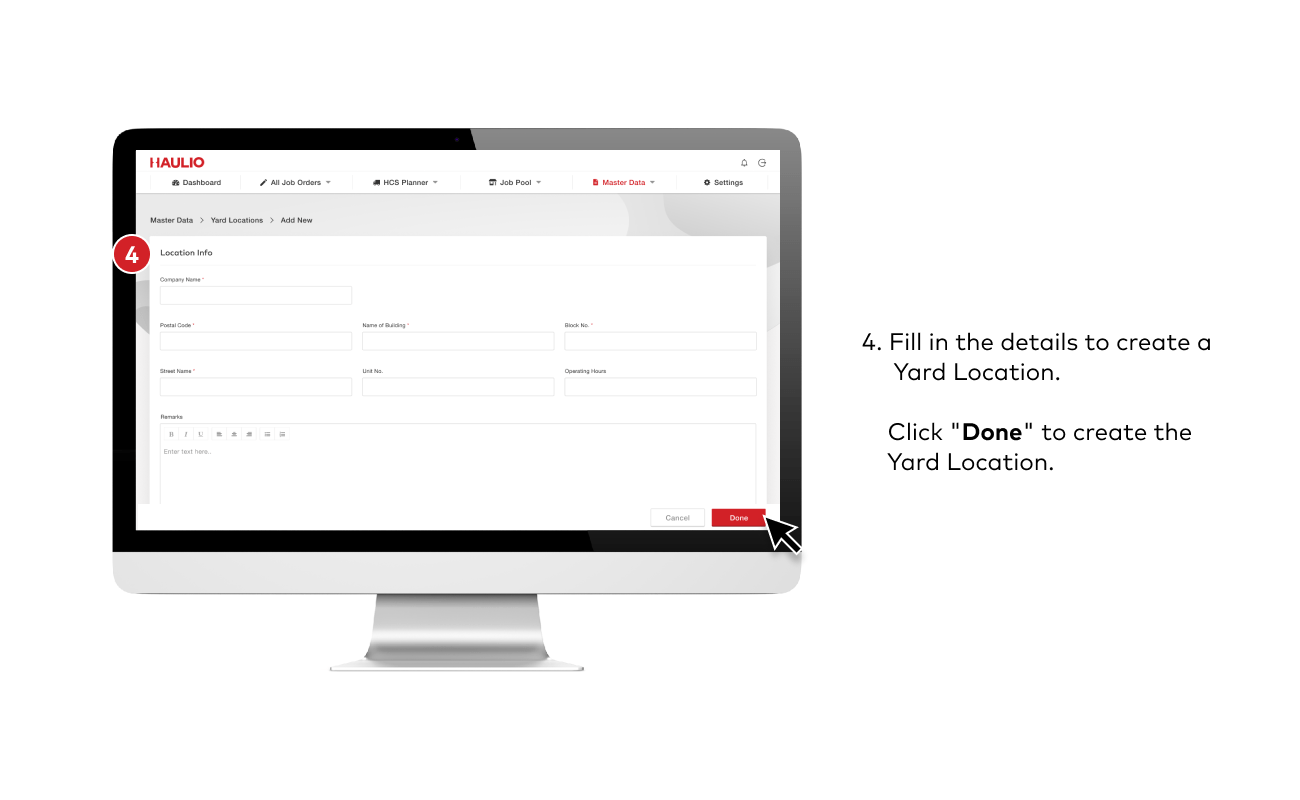
2. Create New Yard Location
Fill in the details to create a Yard Location.
Click “Done” to create the Yard Location.
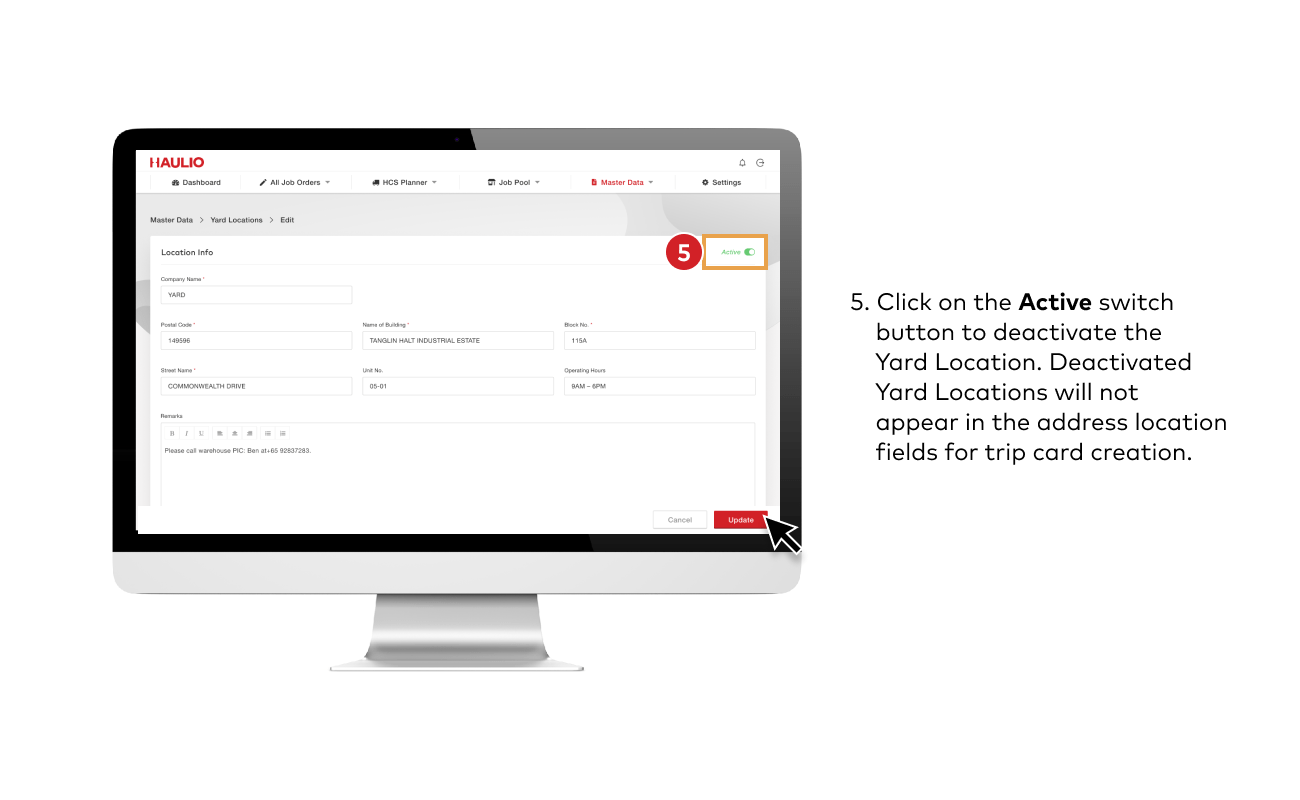
3. Deactivate Yard Location(s)
Click into the Yard Location to edit and update details.
Click on the Active switch button to deactivate the Yard Location. Deactivated Yard Locations will not appear in the address location fields for trip card creation.
Tip!Always remember to click on “Update” to save your changes.
Creating a New Job Order
1) Job Creation Workflow
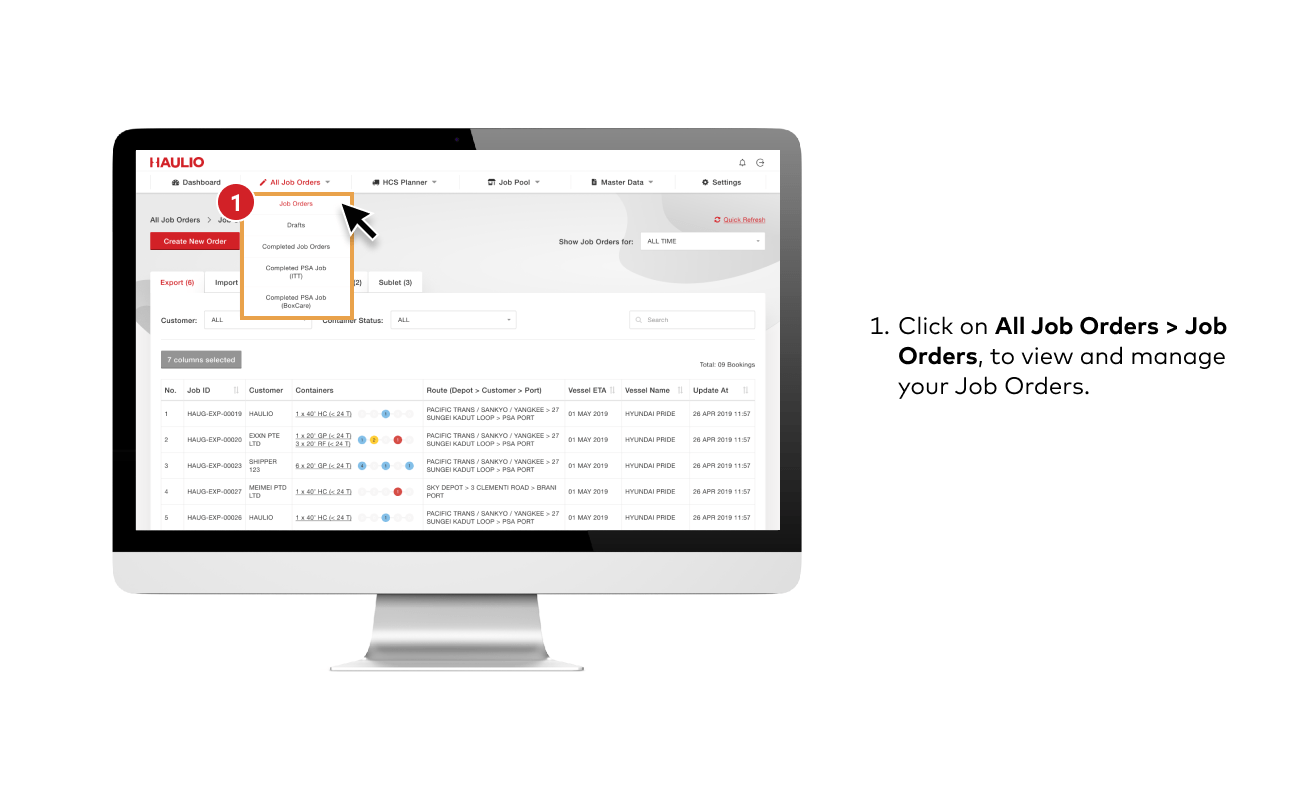
1. View Job Orders
Click on All Job Orders > Job Orders to view and manage your job orders.
2. Create New Job Order
To create a new job order, click the “Create New Job Order” button.
Tip!This button is also available on the Dashboard.
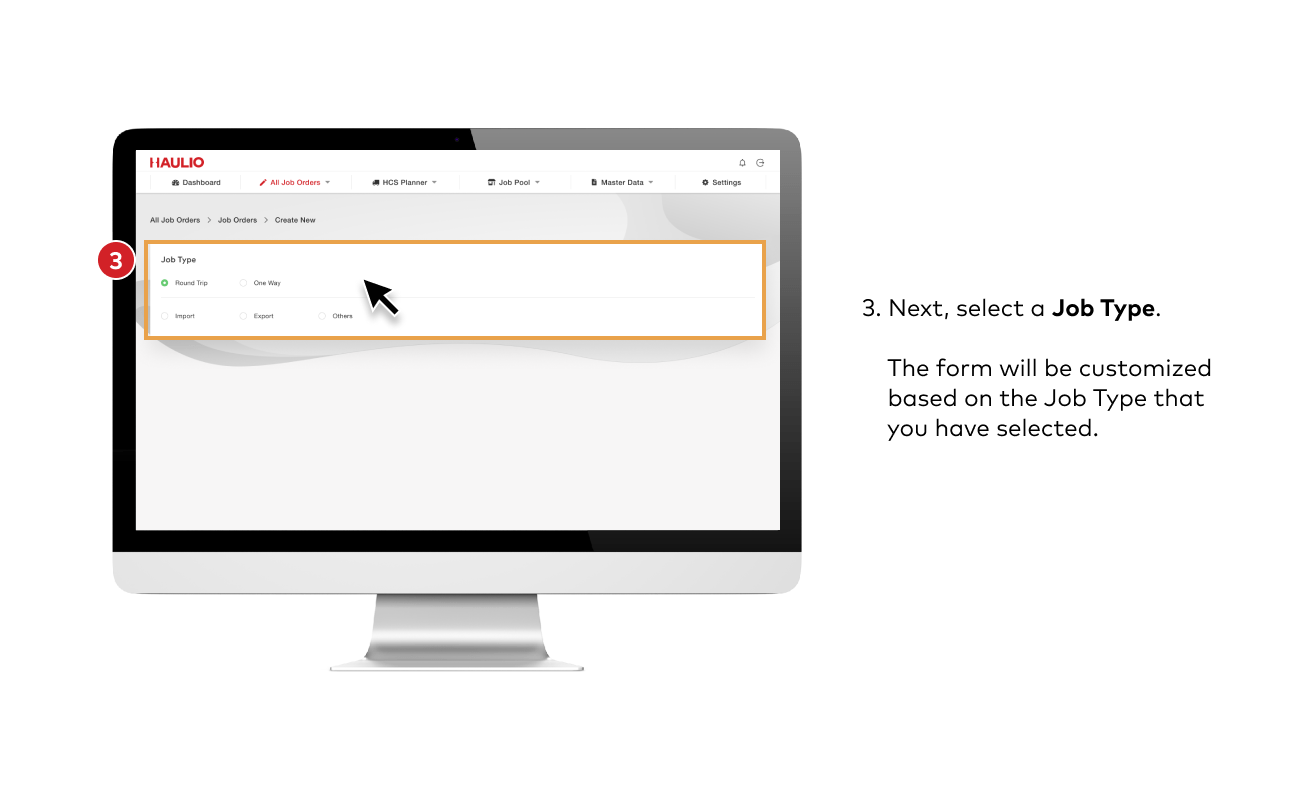
3. Select a Job Type
Next, select a Job Type.
The form will be customized based on the Job Type that you have selected.
4. Select a Customer
Select a Customer. The dropdown list will show the customers you have under your Master Data.
5. Enter Job Details
Enter the Route Information and Job Details.
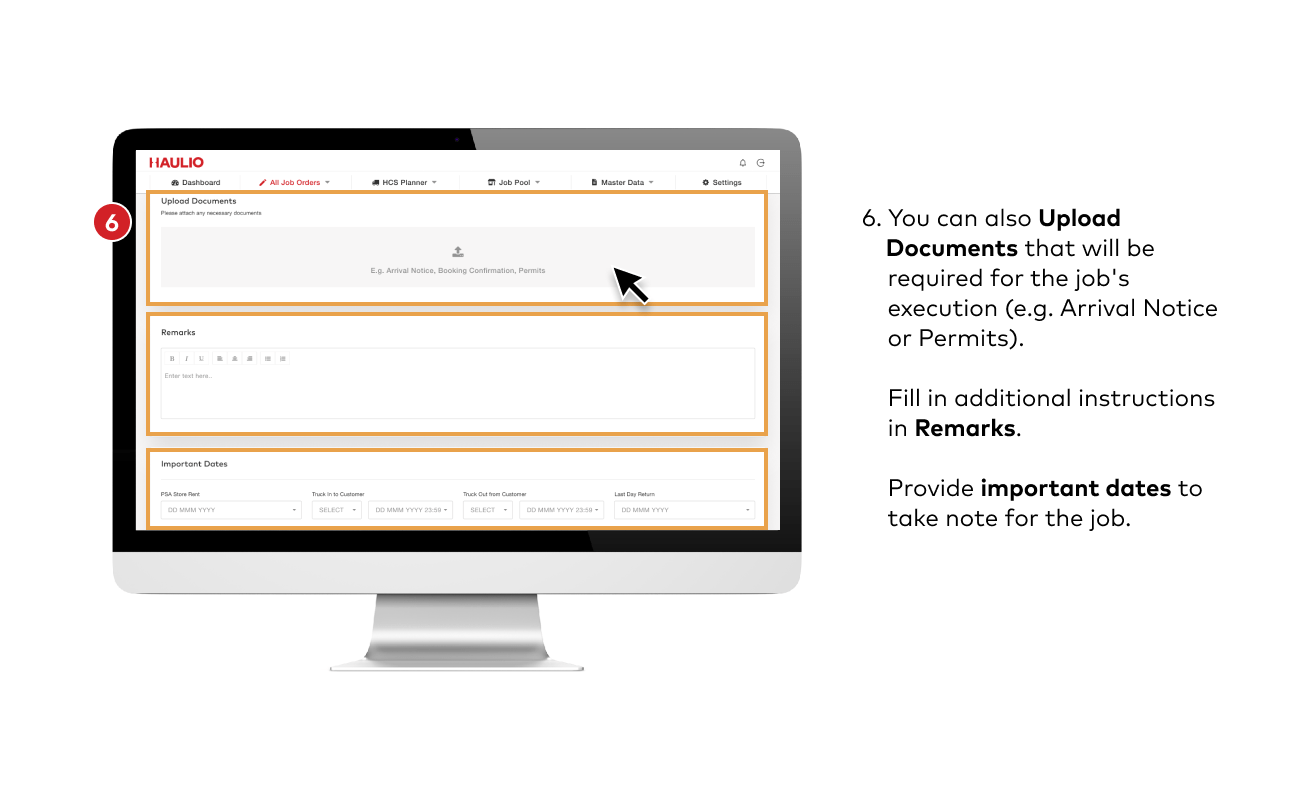
You can also Upload Documents that will be required for the job’s execution (e.g. Arrival Notice or Permits).
Fill in additional instructions in Remarks.
Provide important dates to take note for the job.
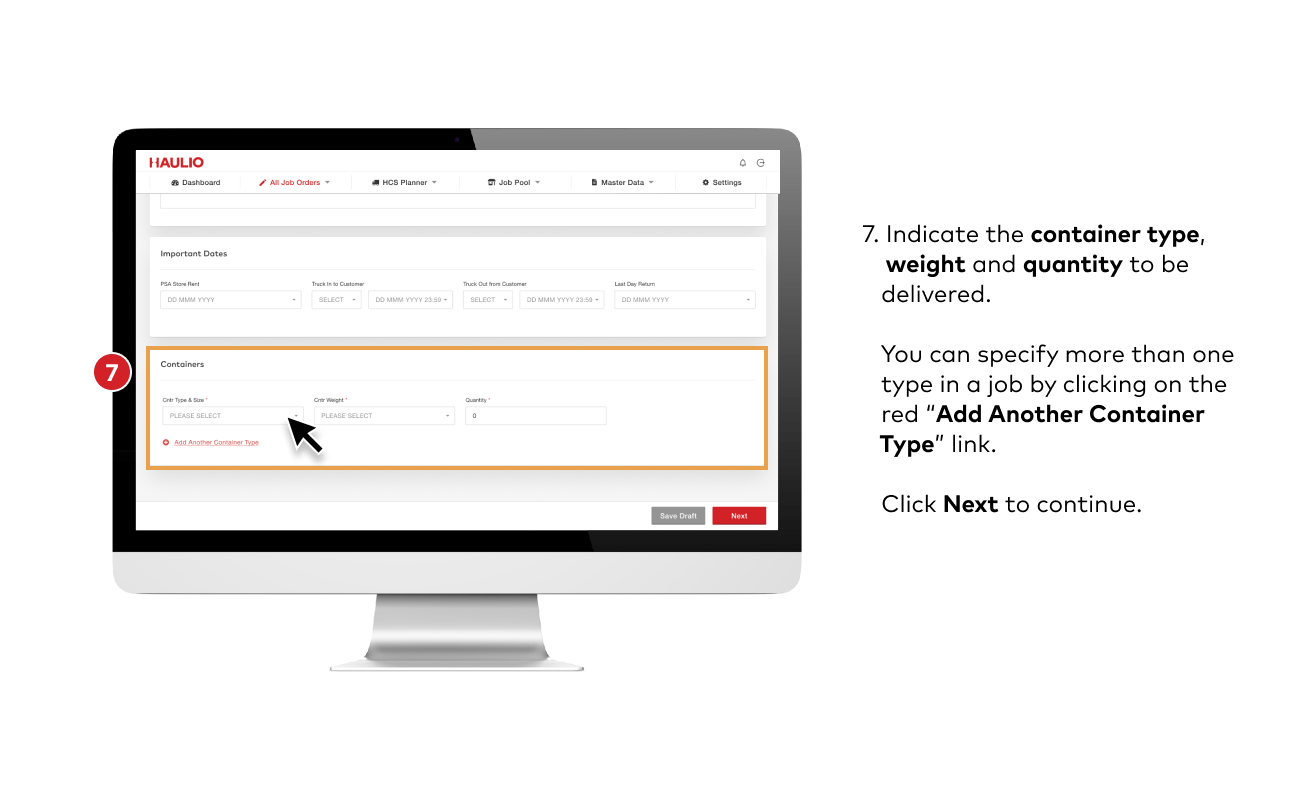
6. Enter Container Details
Indicate the container type, weight and quantity to be delivered.
You can specify more than one type in a job by clicking on the red “Add Another Container Type” link.
Click Next to continue.
A table will appear below where you can enter in the information of each container.
Click Next to continue.
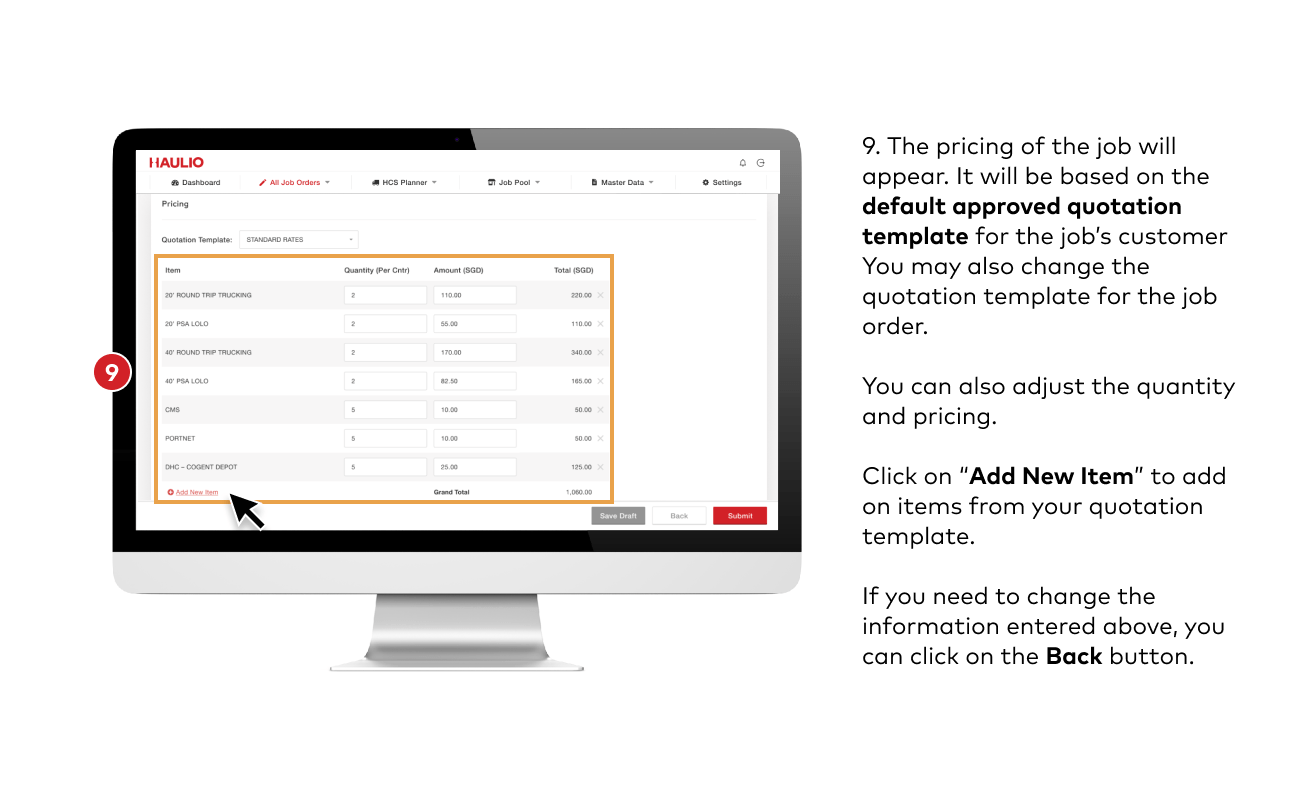
7. Enter Pricing Details
The pricing of the job will appear. It will be based on the default approved quotation template for the job’s customer (refer to Part 1 – Setting Up: Quotation Default Pricings). You may also change the quotation template for the job order.
You can also adjust the quantity and pricing.
Click on “Add New Item” to add on items from your quotation template.
If you need to change the information entered above, you can click on the Back button.
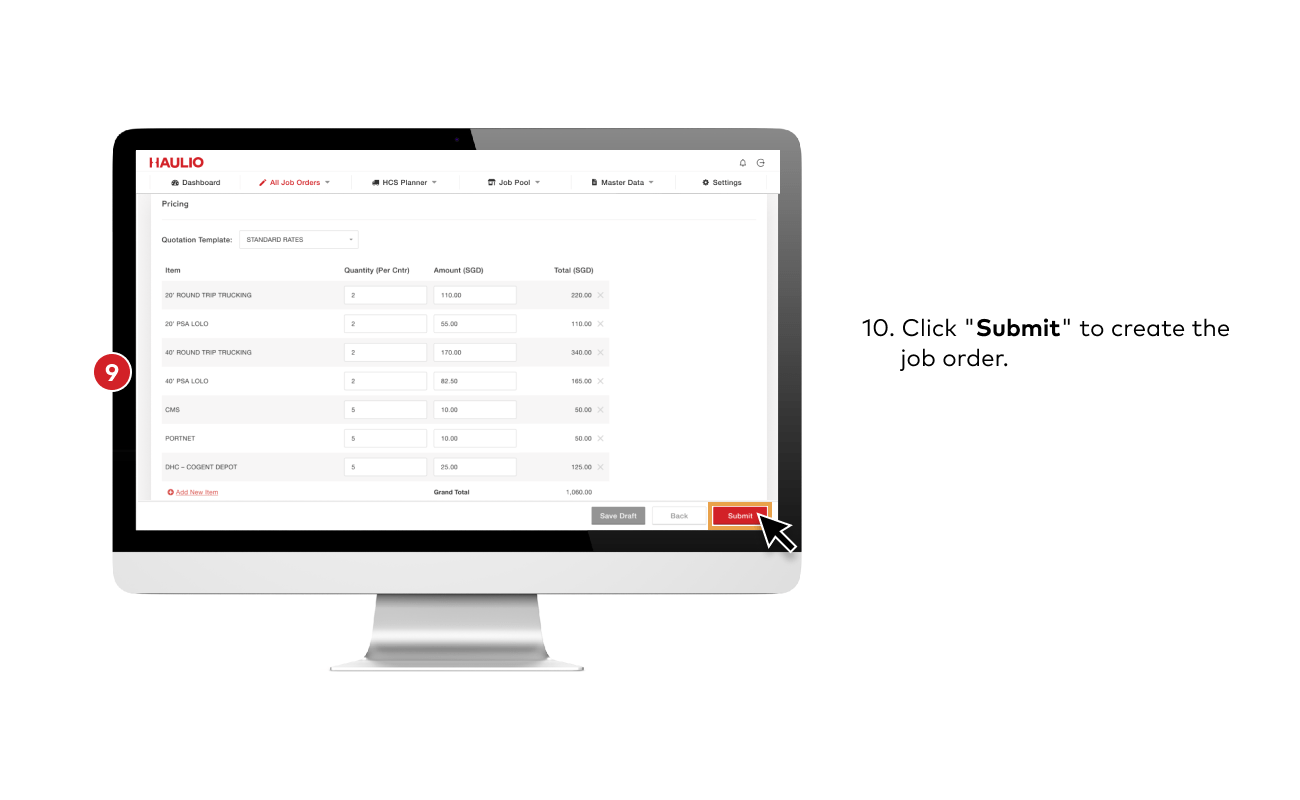
8. Submit Job Order
Click “Submit” to create the job order.
Maximizing the Job List page
1) Filters
1. View Job Orders
Click on All Job Orders > Job Orders to view and manage your job orders.
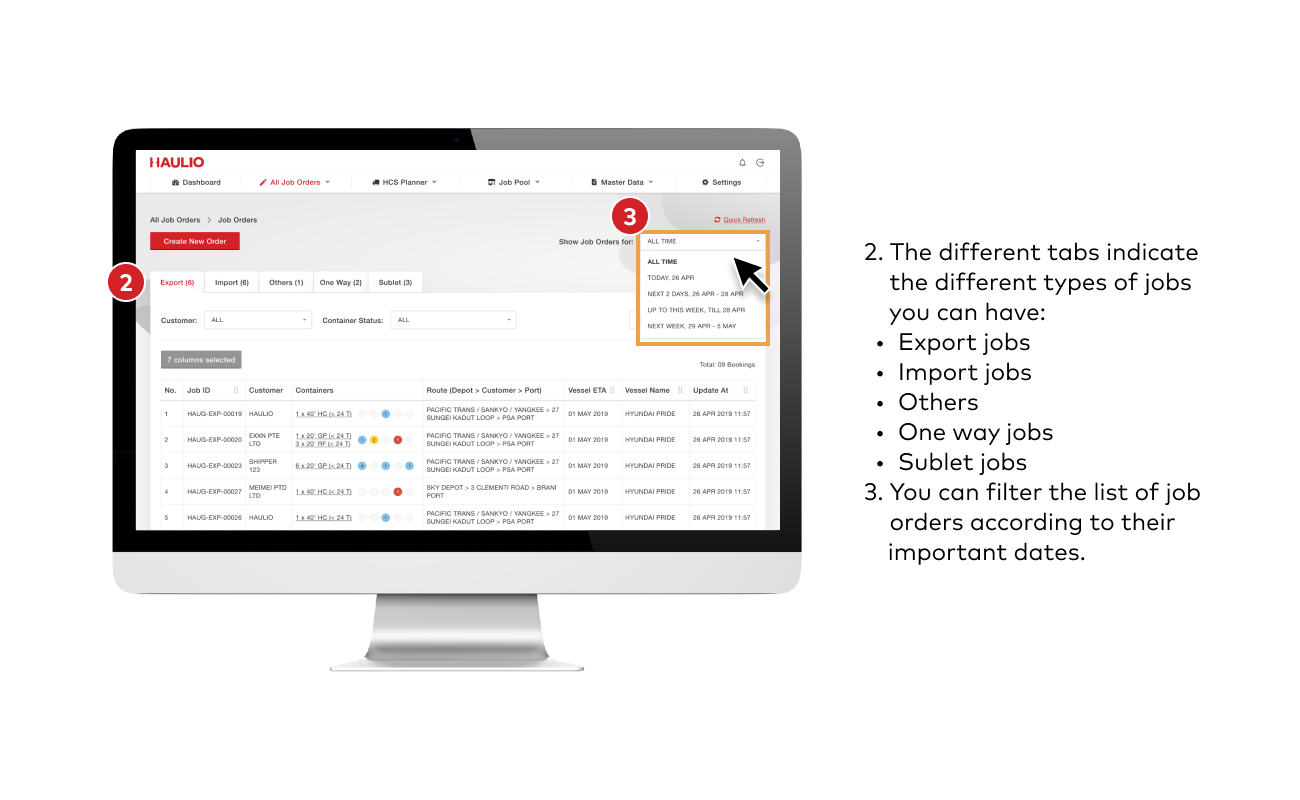
2. Time Filter
The different tabs indicate the different types of jobs you can have:
Export jobs
Import jobs
Others
One way jobs
Sublet jobs
You can filter the list of job orders according to their important dates.
3. Column Filter
You can choose to change the columns you see by clicking on “X columns selected” button to select accordingly.
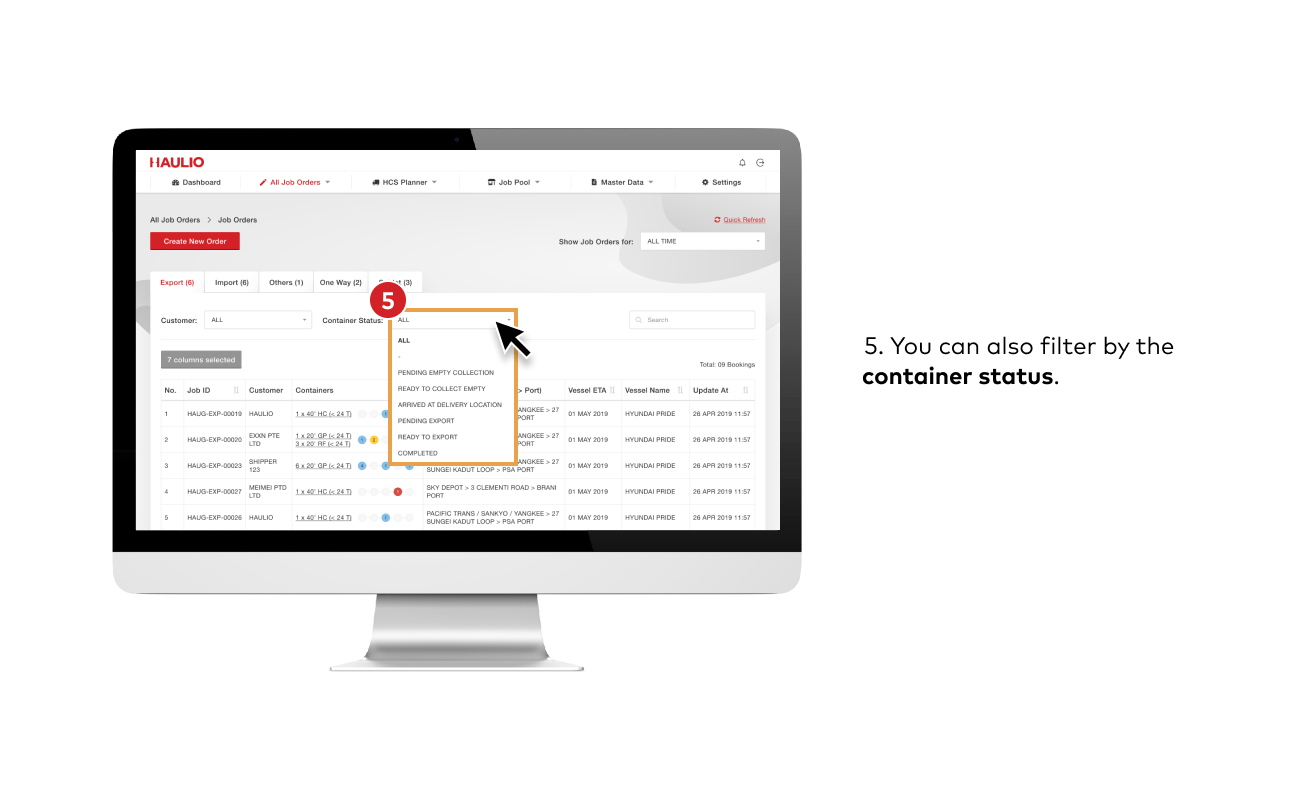
4. Container Status Filter
You can also filter by the container status.
Note:The container statuses differ according to each job type's container status.
2) Container Milestones
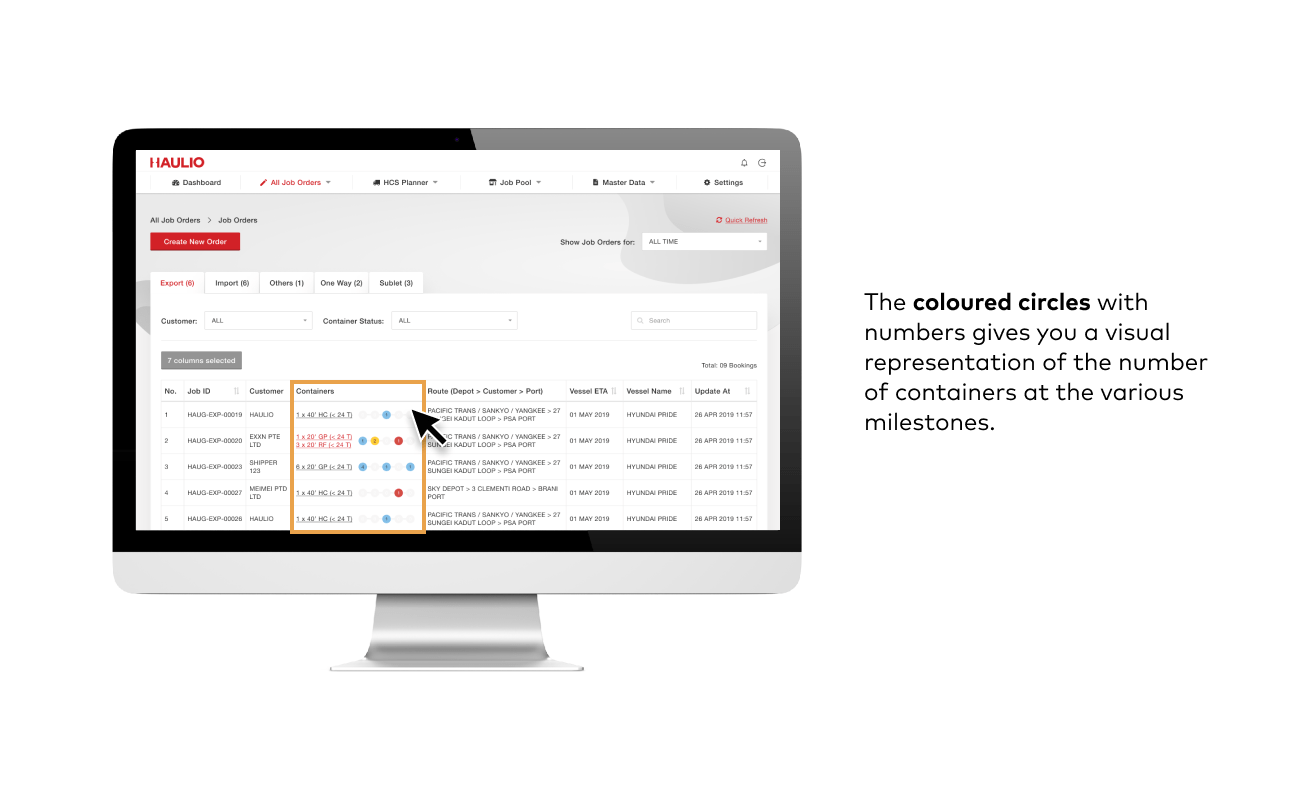
Container Milestones Column
The coloured circles with numbers gives you a visual representation of the number of containers at the various milestones.
Note:The container milestones differ according to each job type.
3) Create HCS Trip Cards Directly
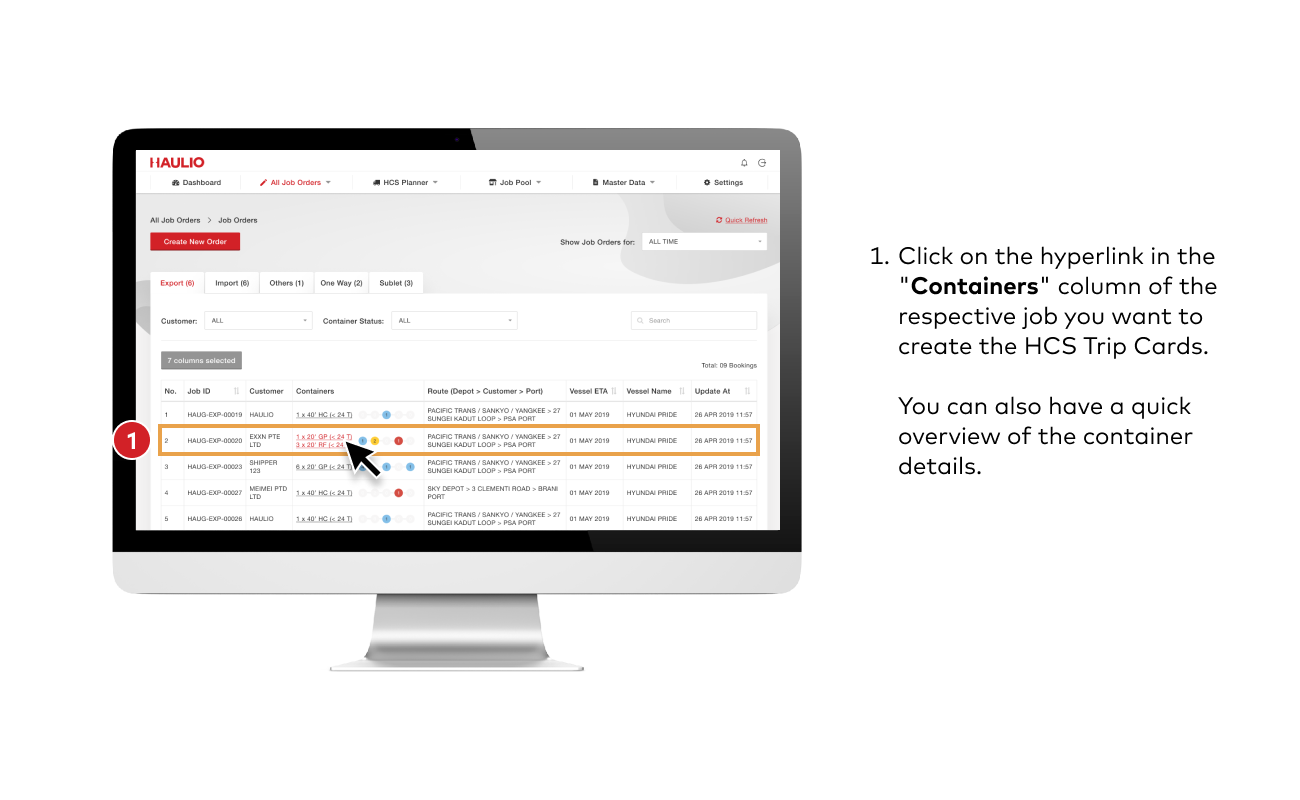
1. Select Job to Create HCS Trip Cards
Click on hyperlink in the “Containers” column of the respective job you want to create the HCS Trip Cards. You can also have a quick overview of the container details.
Note:You can only select 20' containers for double mount.
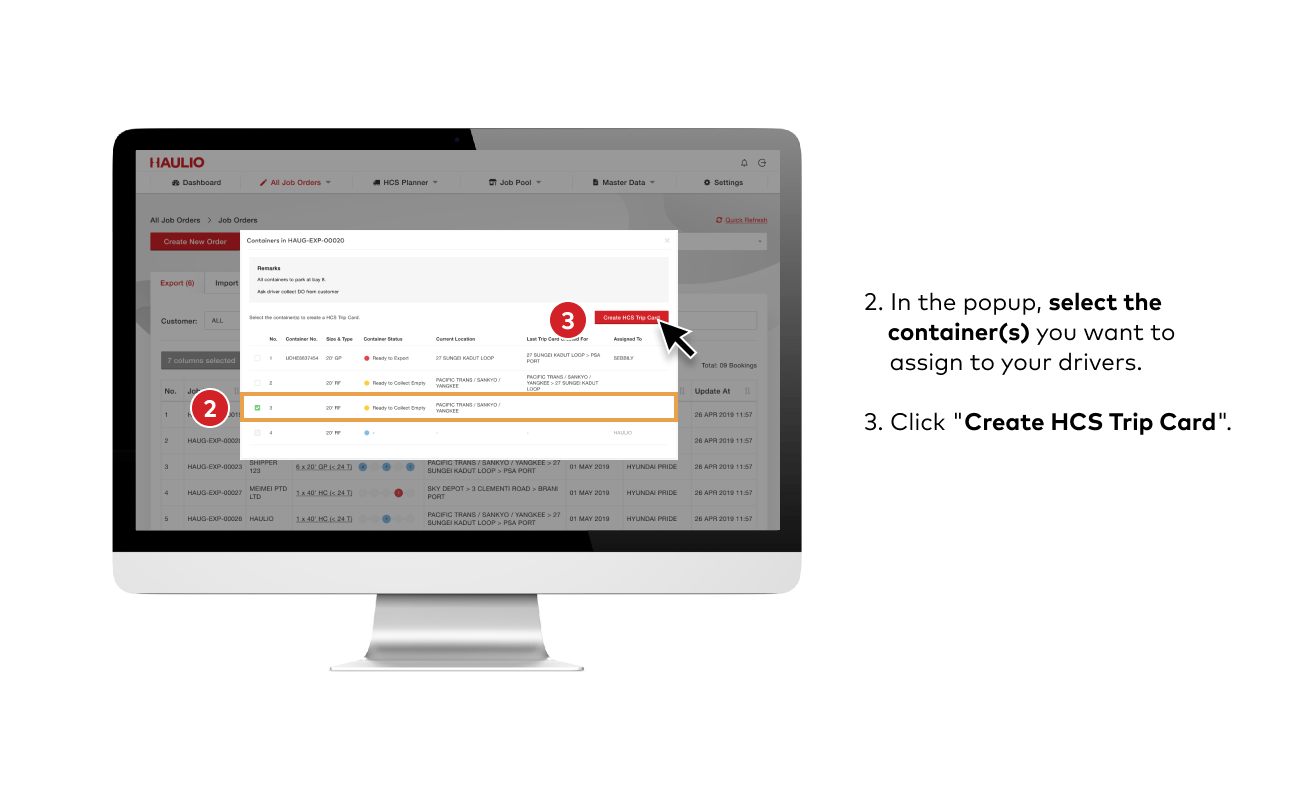
2. Select Containers to Assign
In the popup, select the container(s) you want to assign to your drivers.
Click “Create HCS Trip Card“.
3. Check Details & Assign to Driver
Check the details of the trip.
Select the vehicle/driver you want to assign the trip to.
Click “Send to Driver” to send the trip card to your driver immediately.
Click “Done” if you do not want to send the trip card yet,
Your trip is now created successfully, and you can check it under HCS Planner > Board.
Job Management Page
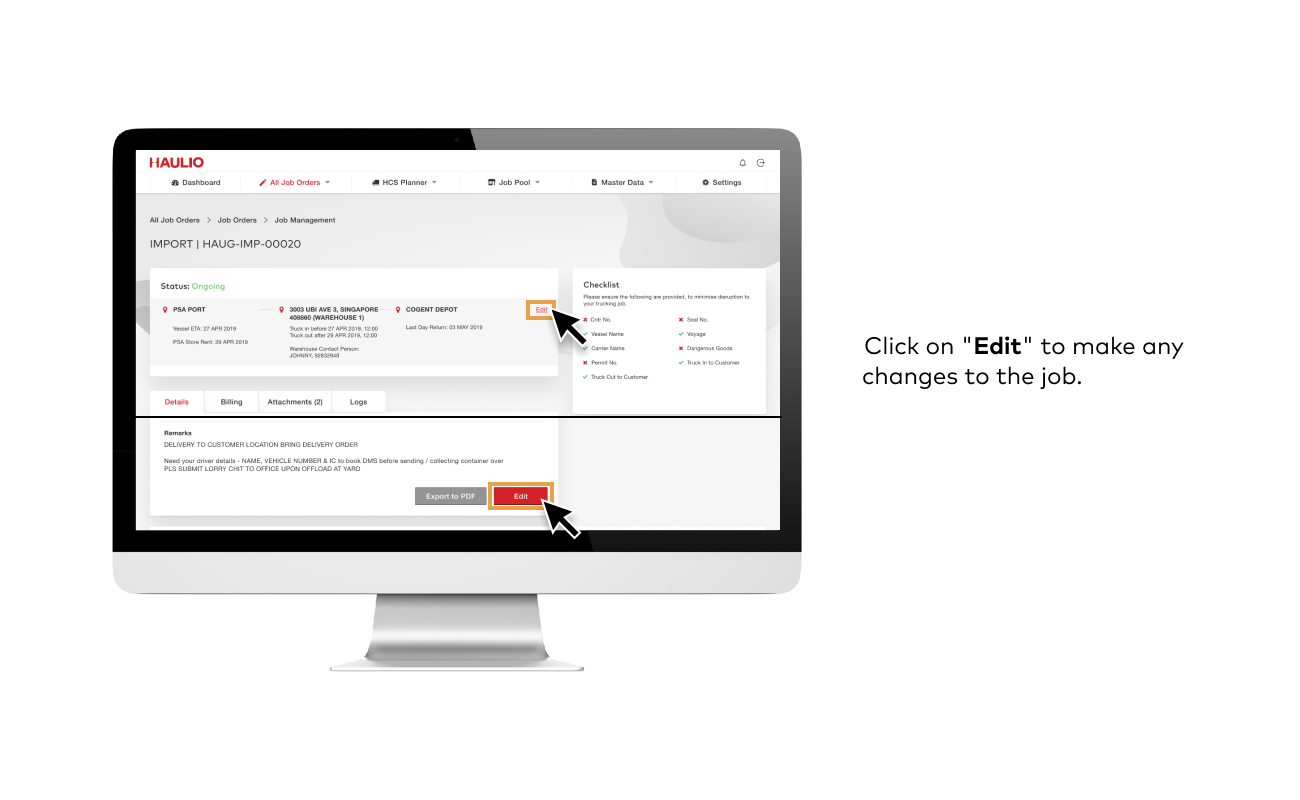
1) Edit Details
Click on “Edit” to make any changes to the job.
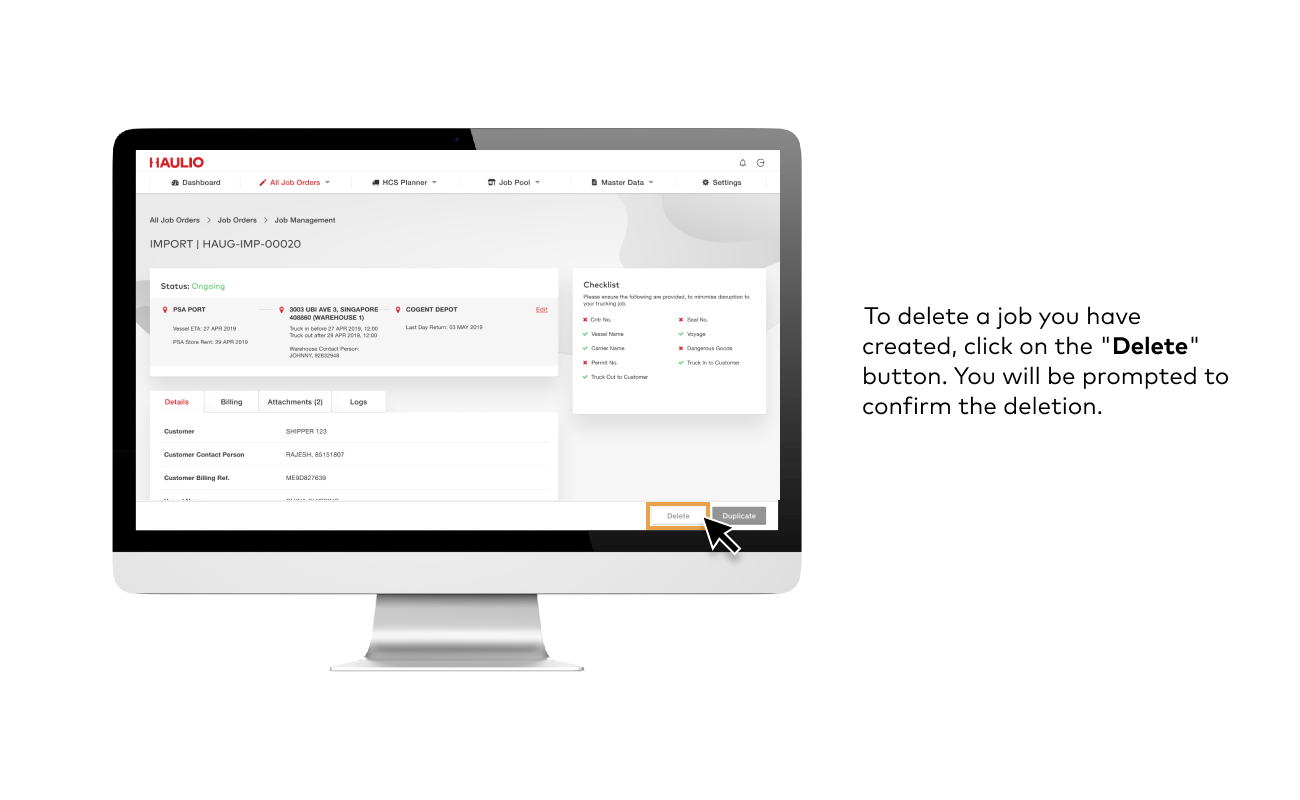
2) Delete Job
To delete a job you have created, click on the “Delete” button. You will be prompted to confirm the deletion.
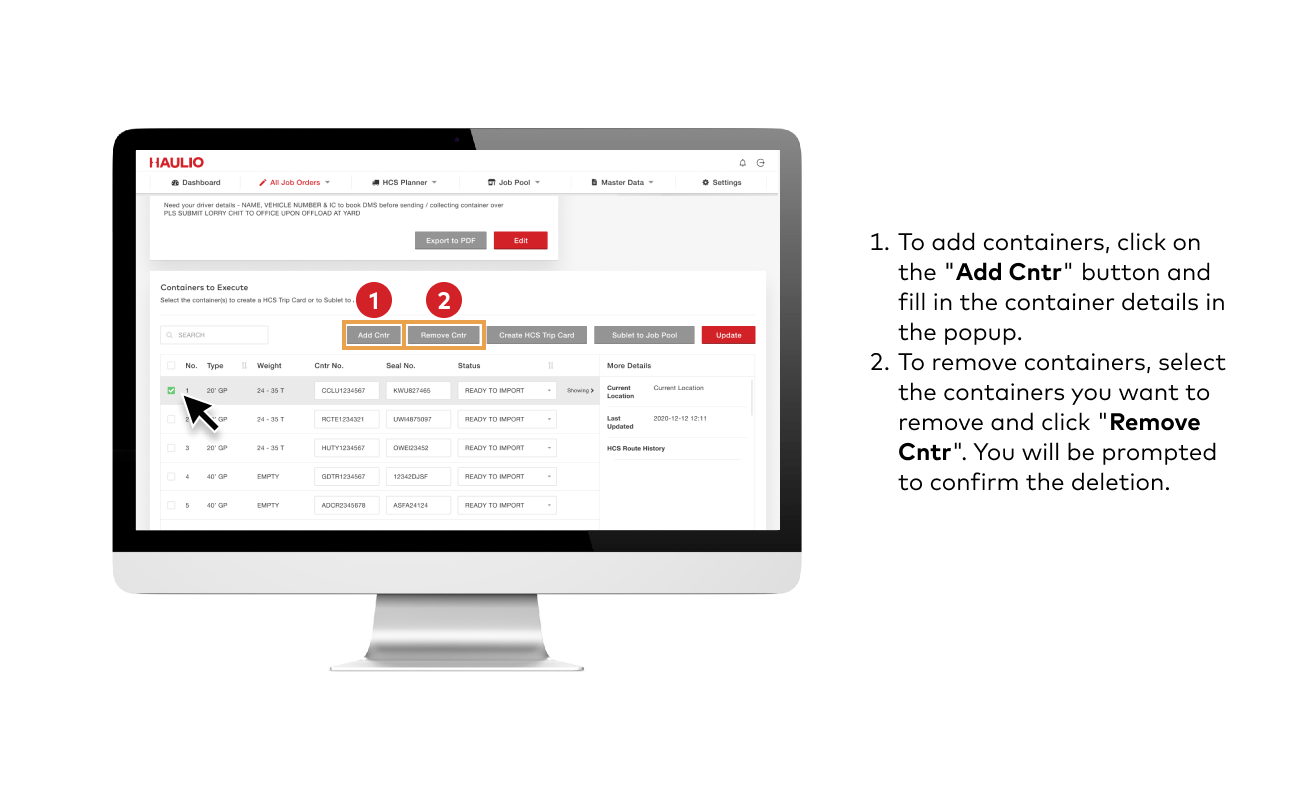
3) Add/Remove Containers
To add containers, click on the “Add Cntr” button and fill in the container details in the popup.
To remove containers, select the containers you want to remove and click “Remove Cntr“. You will be prompted to confirm the deletion.
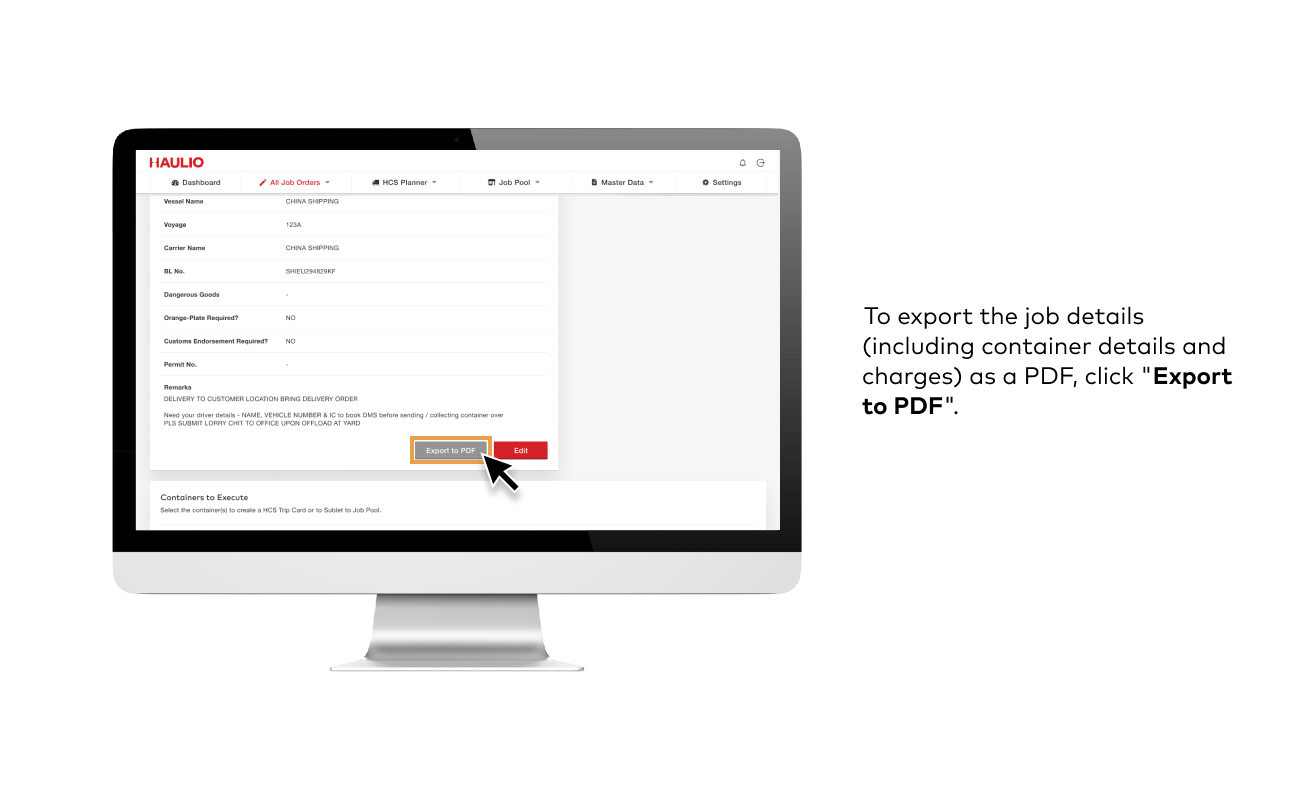
4) Export PDF
To export the job details (including container details and charges) as a PDF, click “Export to PDF“.
5) Create HCS Trip Card
You can create HCS trip cards from the job management page. Select the container you want to assign, and click “Create HCS Trip Card“.
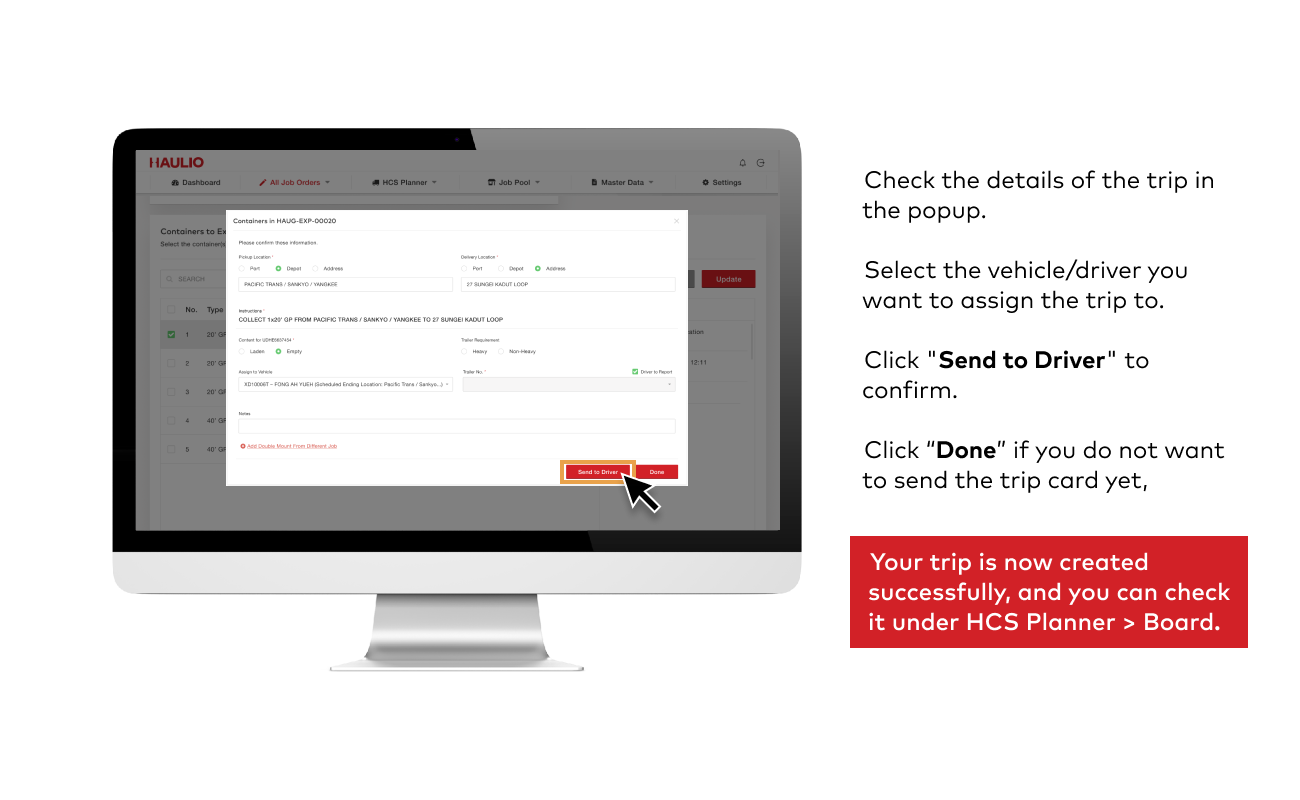
Check the details of the trip in the popup.
Select the vehicle/driver you want to assign the trip to.
Click “Send to Driver” to confirm.
Your trip is now created successfully, and you can check it under HCS Planner > Board.
Note:You can only select 20' containers for double mount.
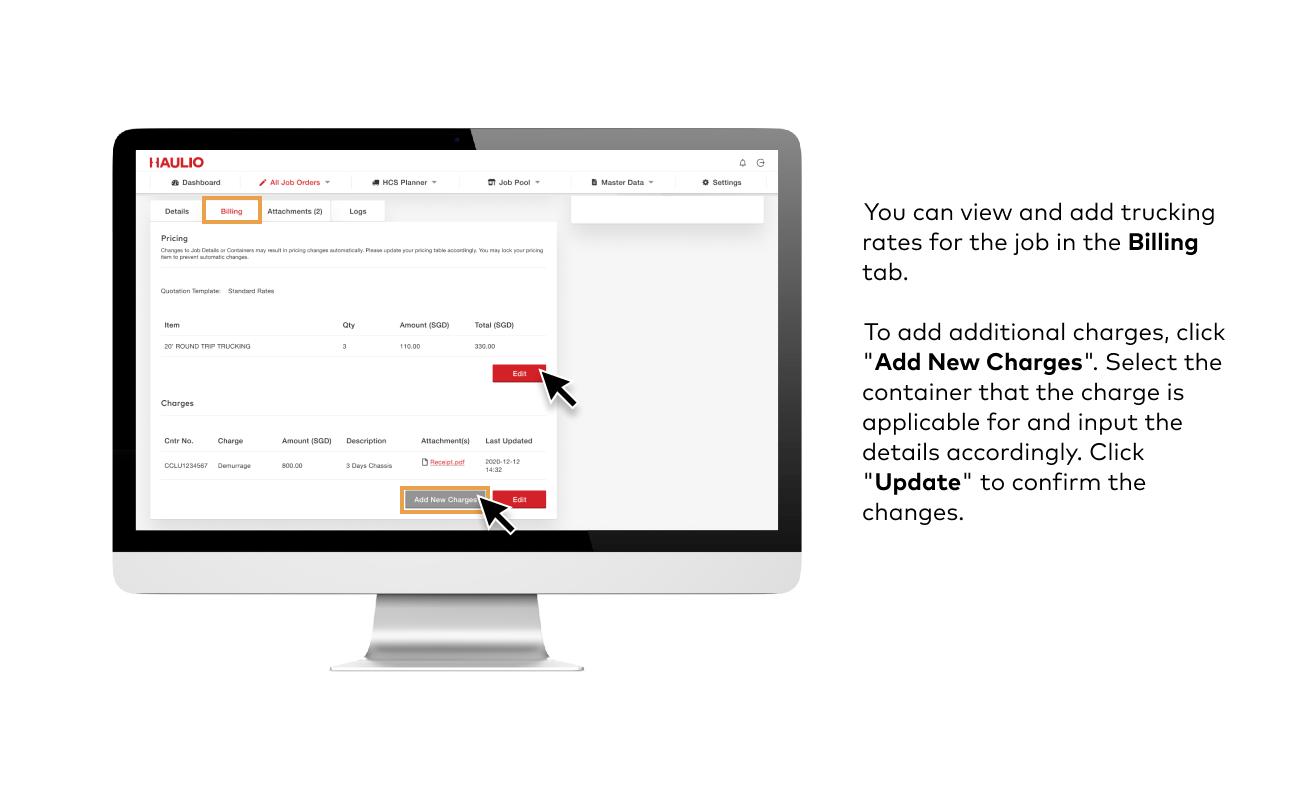
6) Billing Tab & Additional Charges
You can view the trucking rates for the job in the Billing tab.
To add additional charges, click “Add New Charges“. Select the container that the charge is applicable for and input the details accordingly.
Click “Update” to confirm the changes.
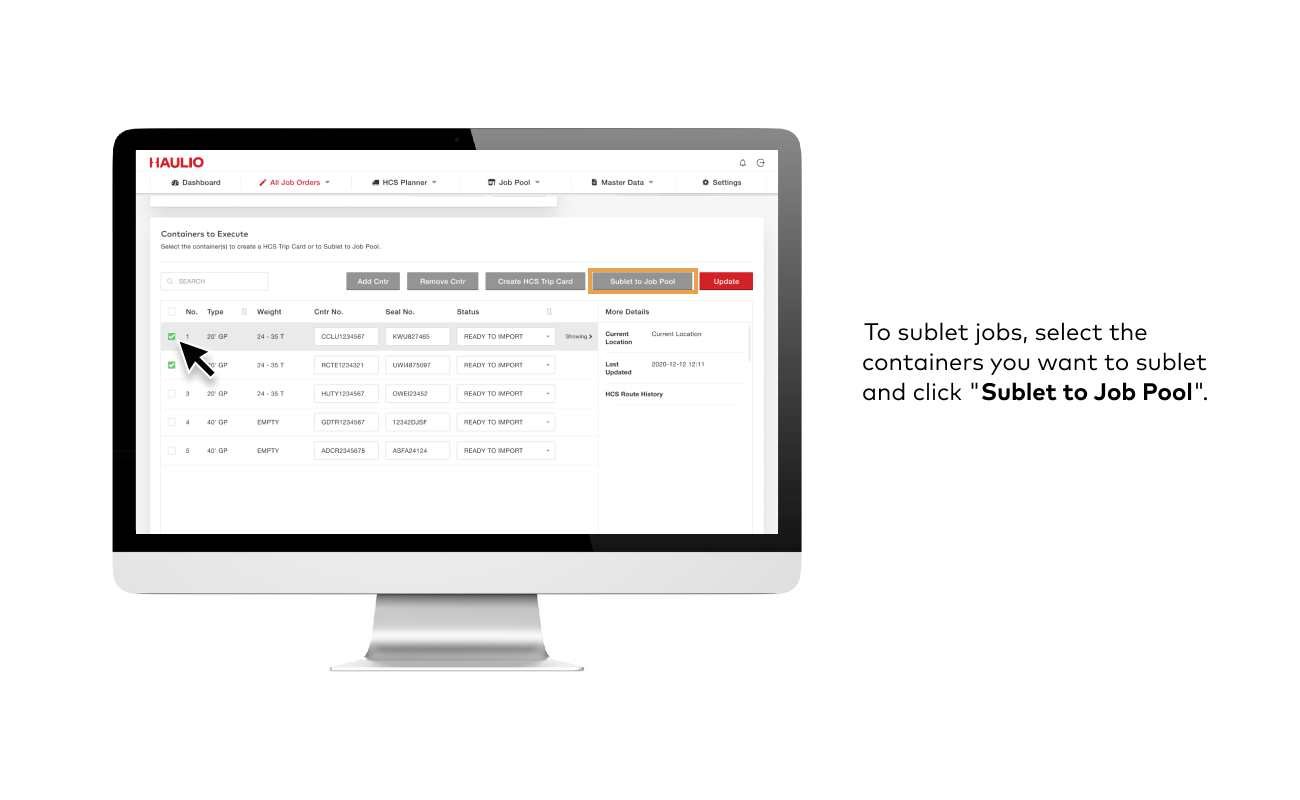
7) Sublet Jobs
To sublet jobs, select the containers you want to sublet and click “Sublet to Job Pool“.
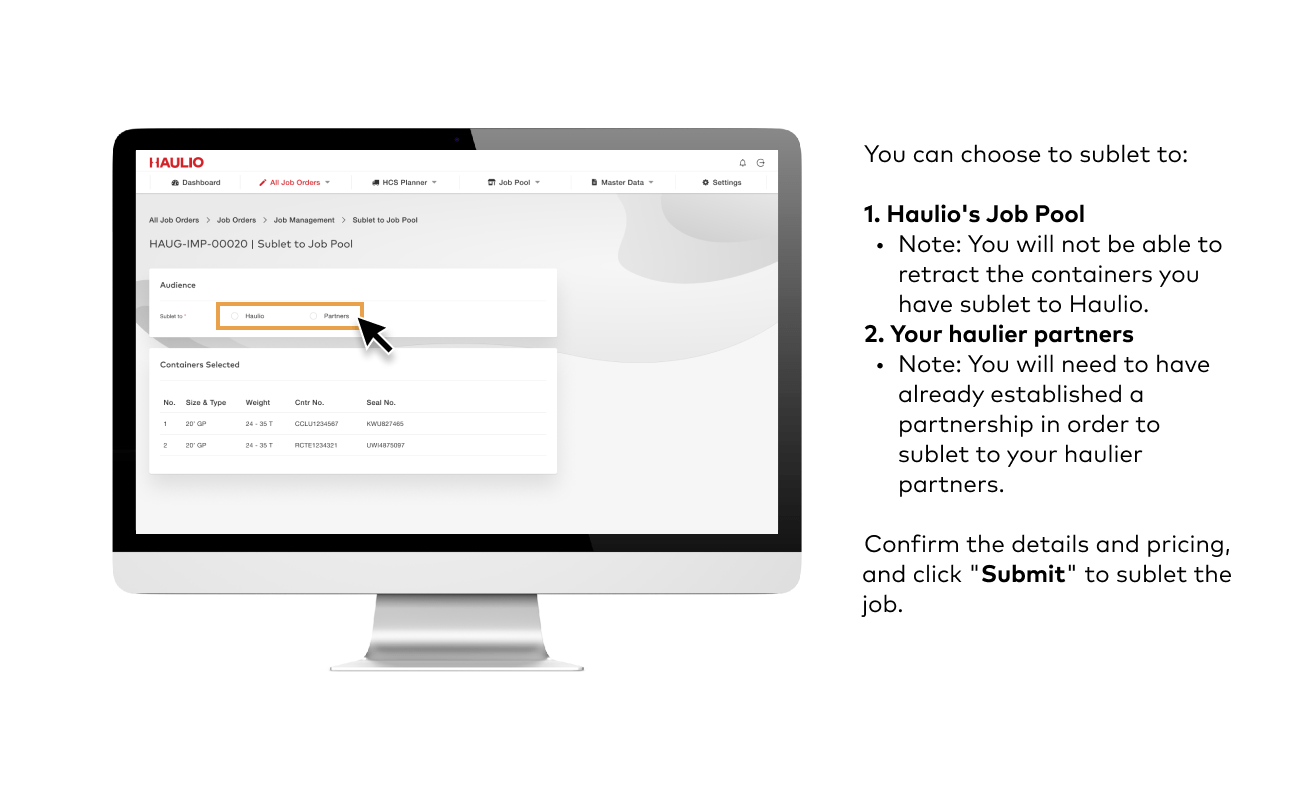
You can choose to sublet to:
Haulio’s Job Pool
Note: You will not be able to retract the containers you have sublet to Haulio.
Your haulier partners
Note: You will need to have already established a partnership in order to sublet to your haulier partners.
Confirm the details and pricing, and click “Submit” to sublet the job.
FAQ
1. It’s been some time since I last logged in and I’ve forgotten my password. How can I retrieve it again?
No worries! Go into and click on “Forgot password”. You will receive an email to reset your password.
2. What is the Haulage Operations Platform (HOP) and the Haulio Connectivity System (HCS)?
The Haulage Operations Platform (HOP) is a cloud-based platform that allows you to manage your fleet and plan trips for your drivers.
Conversely, the Haulio Connectivity System (HCS) is a mobile app for your drivers to communicate with you, with additional features like trip forms and GPS tracking. Get in touch if you’d like to find out more!
3. Is the Haulage Operations Platform (HOP) and Haulio Connectivity System (HCS) free of charge?
The basic HOP and HCS is free of charge. However, the PSA messaging function will be payable. Get in touch with us if you’d like to find out more!
Get In Touch
Questions? We’re happy to help! Get in touch via the form below and we’ll get back to you as soon as possible.